deformers - skinning
For quite a while a rig was mainly composed of joints skinned to the mesh,
and some blendshapes.
There wasn’t a lot else thrown in on top.
What the heck does this mean exactly?
Joints:
Joints are merely transforms describing a position/orientation/scale in 3dSpace.
Some applications treat these as special cases and make them strange first class citizens.
Skinning
Skinning is the art of taking xNum of joints, assigning them to a mesh via
a skinCluster, and then painting each joint’s area of affect onto the mesh.
The act of this painting literally establishes a per joint' relationship
to the vertexes on the mesh by assigning to it a per joint weight value`.
eg: vtx01: [joint01: .5, joint02:.5]
Which would mean that joint01 has a weight of .5 and joint02 has a weight of .5 so each have a %50 influence over the vertex they are assigned to.
That’s it really. Take a bunch of joints, and create their binding relationship
to the 3d mesh. How you do it can be done by hand or by painting using various
tools in your application of choice.
Doing it by hand on complex meshes … shudder / run screaming!
Further reading:
These 2 fundamentals haven’t changed much in the last 20 years so I think it’s important to at least show you how to handle them, even if it doesn’t make too much sense at this time.
We have paintWeight tools to help make this a much easier job for us! So lets look at my general go to starting process for skinning.
My Style of Painting Weights for the last 20years
Years and years ago I started treating the whole process of weight painting as the Bastard son of Satan! As a result, I ONLY WORK ON JOINT PAIRS and do not have any faith/trust/respect for any kind of `auto’ weight assignments while doing the work.
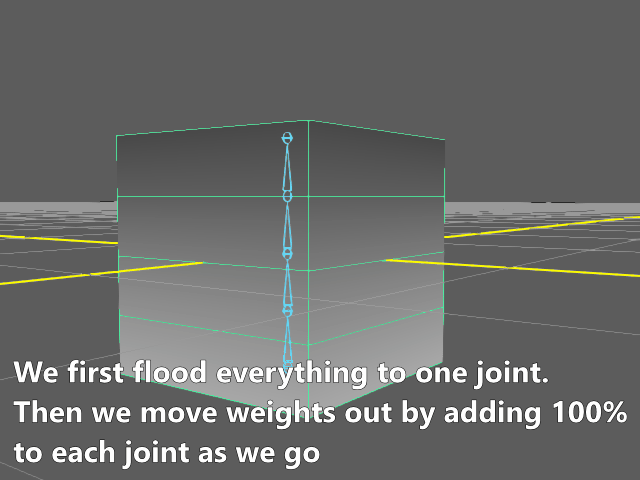
Essentially for the last 20 years (and to this day) my weight painting workflow is this;
- assign ONLY the joints required to deform the mesh to the skinCluster
- go through the ENTIRE set of joints and paint a %100 relationship for each joint
- work on normalized weights at all times (weights that will never exceed 1.0 in influence)
- use a TRUSTED smoothing algorithm to flood smooth a base smooth to ALL joints
- only ever work on PAIRS of joints and only ever ADD TO a joint never take away from it.
- prune (carefully so as not to destroy very soft weighting)
Why?
- If I assigned every joint under the sun I’m asking my DCC (Digital content creator) to do a bunch of math that’s unnecessary!
- I can CLEARLY dictate a `rigid’ bind that will show exactly what joint is affecting which part of the mesh without having to manage smoothing etc
- I get to see the results of normalizing as I work
- I save time by having the computer do the BASE smoothing across ALL the joints for me
- I am in control of which joint I am adding weights to and WHERE it is coming FROM
- I remove a ton of redundant small weight data. (making scene file save sizes smaller / less work on the cpu if weights remove a joint entirely from the calc)
If you do this, you’ll be much more in control of your weight painting and you’ll find it a whole lot less painful.
Here’s a look at the process in action.
Shout out to some handy Maya tools
Brave Rabbit brsmoothweights - Maya
This is a great tool for hitting an area of a mesh you want to smooth out and get great trusted results from the smooth. I’ve used this a bit recently and haven’t suffered significant side effects. Reccommend this tool. Will save you a lot of time.
ngSkinTools - Maya
The layering / masking / filtering in ngSkinTools just makes life a lot easier. It’s how the skinning tools should work really. The only down side here is for some pipelines you have to remove underlying nodes before submitting to farms etc and that can result in the stack no longer existing in the scene when you grab an asset from the server etc. But there are ways around that.. so…